FOTA Development Guide_Rev1.0
Revision History
Version |
Date |
Author |
Revision Content |
|---|---|---|---|
Rev1.0 |
26-3-26 |
ljz |
Initial document creation |
1 Introduction
This document introduces the LTE-EC71X differential upgrade interface APIs. The API interfaces are declared in the file components/kernel/lierda_api/liot_fota2/liot_fota2.h.
Functional Limitations:
Only supports three upgrade methods: HTTP, FTP, and local file system. HTTPS and FTPS encrypted protocols are not currently supported.
The FOTA function has sufficient reserved space, and user-defined partition modification is not currently supported.
1.1 Module Upgrade Process Principle
Overall Process Description
The module’s FOTA upgrade process mainly includes four stages: differential package download, verification validation, firmware restoration, and system reboot upgrade.
The overall process is as follows:
Download the differential upgrade package (.par format) to the module file system via HTTP/FTP/file system;
After download completion, the underlying layer performs integrity verification. If verification fails, the upgrade is terminated; if verification passes, proceed to the next step;
The module automatically reboots and enters Bootloader mode, where Bootloader executes firmware restoration and Flash erase/write operations;
After firmware restoration is complete, the system reboots again, loads the new firmware, and operates normally.
Verification Mechanism
The verification phase includes two parts: old firmware consistency verification and differential package integrity verification. Failure in either part will cause upgrade abortion. The verification logic is as follows:
Old Firmware Consistency Verification: Recalculate the checksum of the device’s current firmware and compare it with the checksum recorded in the differential package to ensure the old firmware version matches;
Differential Package Integrity Verification: Verify whether the differential package data is complete and undamaged to prevent upgrade failure due to data errors.
Upgrade Process
After the module receives the upgrade command and completes differential package download and verification, it automatically reboots, starting with the Bootloader program first;
Bootloader checks whether the differential package exists and reads the upgrade flag bit;
If the differential package exists and the flag bit is “not upgraded”, execute the differential restoration algorithm, restore new firmware content segment by segment, and overwrite it to Flash;
During the restoration process, Bootloader performs three operations:
Write upgrade flag bit;
Update upgrade progress information;
Cyclically execute the “restore → overwrite → record progress” process until upgrade completion;
After upgrade completion, the system reboots again;
Based on the upgrade flag bit status:
If upgrade is successful, Bootloader deletes the differential package file and updates the flag bit;
Then jump to execute the new application.
2 API Function Overview
FOTA2 function currently provides only one core upgrade function, responsible for verifying upgrade package information and writing to the FOTA partition. Function information is as follows:
Function |
Description |
|---|---|
|
Used to verify upgrade package information stored in the file system, and write to the fota partition after verification |
3 Type Descriptions
3.1 liot_fota_err_e
FOTA error codes.
Declaration
typedef enum
{
    L_FOTA_UPGRADE_SUCCESS             = 0,   /*!< Indicates that the FOTA upgrade was successful.*/
    L_FOTA_UPGRADE_FAIL                = 1,   /*!< General FOTA upgrade failure.*/
    L_FOTA_UPGRADE_CHECK_FAIL          = 2,   /*!< FOTA upgrade check failed.*/
    L_FOTA_UPGRADE_MD5_FAIL            = 3,   /*!< MD5 checksum verification of the FOTA package failed.*/
    L_FOTA_UPGRADE_MATCH_FAIL          = 4,   /*!< FOTA package does not match the device requirements.*/
    L_FOTA_UPGRADE_NO_FILE_FAIL        = 5,   /*!< FOTA file not found or missing.*/
    L_FOTA_UPGRADE_OPENFILE_FAIL       = 6,   /*!< Failed to open the FOTA upgrade file.*/
    L_FOTA_UPGRADE_FILESIZE_FAIL       = 7,   /*!< Invalid or unsupported FOTA file size.*/
    L_FOTA_UPGRADE_LFS_MOUNT_FAIL      = 8,   /*!< Failed to mount LittleFS (LFS) for FOTA.*/
    L_FOTA_UPGRADE_PARAM_FAIL          = 9,   /*!< Invalid input parameters for FOTA upgrade.*/
    L_FOTA_UPGRADE_PROJECT_MATCH_FAIL  = 10,  /*!< Project name in FOTA package does not match the device.*/
    L_FOTA_UPGRADE_BASELINE_MATCH_FAIL = 11,  /*!< Baseline version in FOTA package does not match the device.*/
    L_FOTA_UPGRADE_POINT_NULL_ERR      = 12,  /*!< Null pointer error during FOTA upgrade.*/
    L_FOTA_UPGRADE_FLAG_SET_ERR        = 13,  /*!< Failed to set the upgrade flag during FOTA.*/
} liot_fota_err_e;
Parameters
Parameter |
Description |
|---|---|
|
Execution successful |
|
Execution failed |
|
FOTA upgrade package verification failed |
|
FOTA upgrade package MD5 verification failed |
|
FOTA upgrade file matching failed |
|
No upgrade package file |
|
Failed to open file |
|
Upgrade package file length exceeds limit |
|
File system loading failed |
|
Parameter error |
|
Project mismatch |
|
Baseline mismatch |
|
Null pointer |
|
Flag bit setting error |
3.2 Liot_FotaConfig_t
FOTA parameter configuration structure. Used to configure core FOTA upgrade parameters, including upgrade link, automatic reboot, timeout, and callback function.
Declaration
typedef struct
{
    char *url;                   // Upgrade link, supports http, ftp, and local file system types
    bool enable;                 // Whether to automatically reboot for upgrade after download: true-auto reboot, false-download and verify only without reboot
    uint32_t timeout;            // Timeout time, unit: milliseconds (ms)
    liot_fota_callback callback; // FOTA process status callback function, used to report download progress in real-time
} Liot_FotaConfig_t;
Parameters
Parameter |
Description |
|---|---|
url |
Upgrade package acquisition link, with strict format requirements: |
enable |
Whether to enable automatic reboot upgrade. |
timeout |
Download timeout time (unit: milliseconds). |
callback |
FOTA process status callback function, used to report download progress. |
4 API Function Details
4.1 Liot_FotaUpgrade
The core function of FOTA2 upgrade, responsible for obtaining the differential package from the specified address (HTTP/FTP/local file) based on the input configuration parameters, performing verification, writing the differential package to the file system after verification passes, and determining whether to automatically reboot for upgrade based on the enable parameter. After related business processing is complete, you can call liot_power_reset() to reboot.
Declaration
liot_fota_err_e Liot_FotaUpgrade(Liot_FotaConfig_t *fota_config)
Parameters
fota_config:
[In] Upgrade parameter configuration, see Chapter 3.2 for details.
Return Value
liot_fota_err_e: Execution result code, see Chapter 3.1 for reference.
5 Pre-upgrade Preparation
5.1 Differential Package Creation
The differential package is the core file for FOTA upgrade, generated by FotaToolkit tool using the old firmware (current device running version) and new firmware (target upgrade version). It supports two methods: base package + APP differential upgrade and single APP differential upgrade. Tool preparation and configuration modification must be completed before creation.
5.1.1 Differential Tool Acquisition
FotaToolkit tool: FotaToolkit_V3.6.16.0.zip, directly extract after download, no installation required.
Firmware Preparation
Two firmware files need to be prepared in advance. Firmware is located in the LSDK/gccout directory. For base package + APP upgrade method, use binpkg format firmware; for single APP differential upgrade, use bin format firmware:
Old Firmware File (Old File): The firmware version currently running on the device.
Target Firmware File (Delta File): The target firmware version for upgrade.
5.1.2 Confirm APP Partition Size
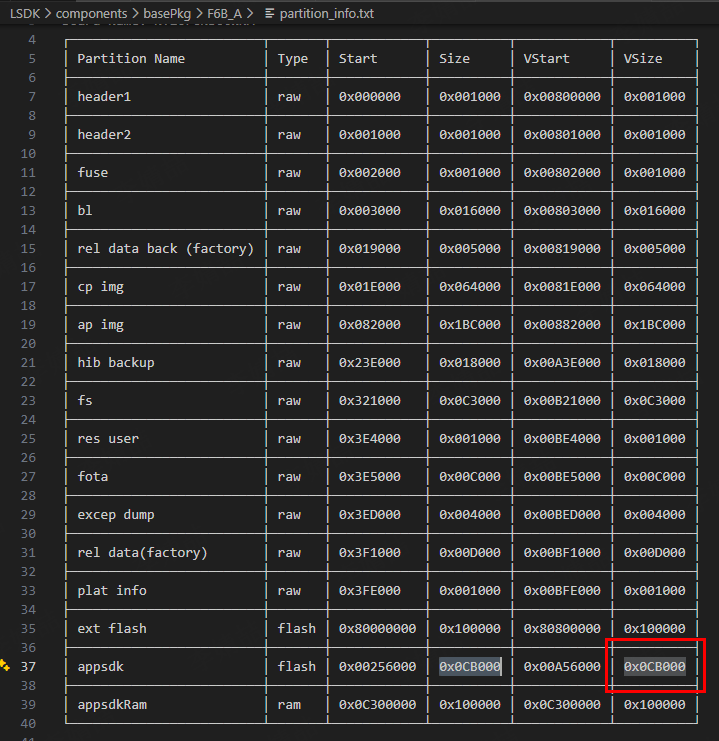
The base package separation scheme requires additional modification of the tool’s configuration file. First, confirm the current APP size in LSDK/components/basePkg/[module_model]/partition_info.txt (e.g., for F6B_A model: LSDK/components/basePkg/F6B_A/partition_info.txt). Find the Size field of the appsdk partition and record its hexadecimal size (e.g., 0x0CB000).
5.1.3 Modify FotaToolkit Configuration File
Enter the FotaToolkit root directory and open the configuration file: ./config/[module_model].json (e.g., ec718pm.json for EC718PM model);
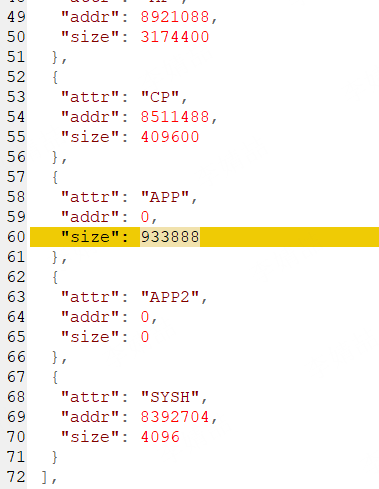
Find the size field corresponding to attr:“APP” (APP partition). This field represents the planned maximum storage load size. Change its value to a decimal number appropriately larger than the actual APP partition. There is no requirement for alignment or staying within partition boundaries. For example, if the actual APP size is 831448, change it to 933888;
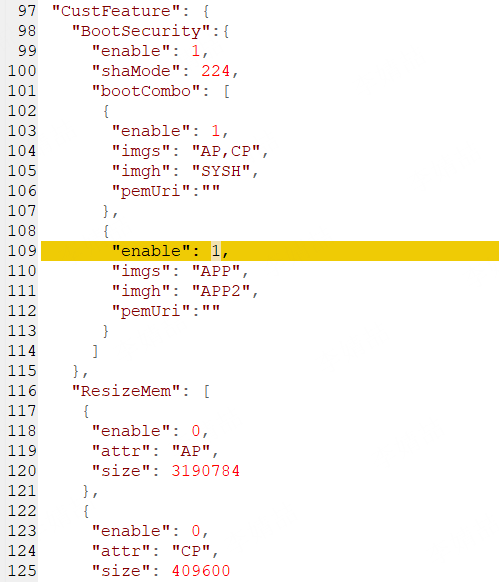
Enable APP upgrade
Save the configuration file. After modification, close the file and reopen the tool to ensure the configuration takes effect.
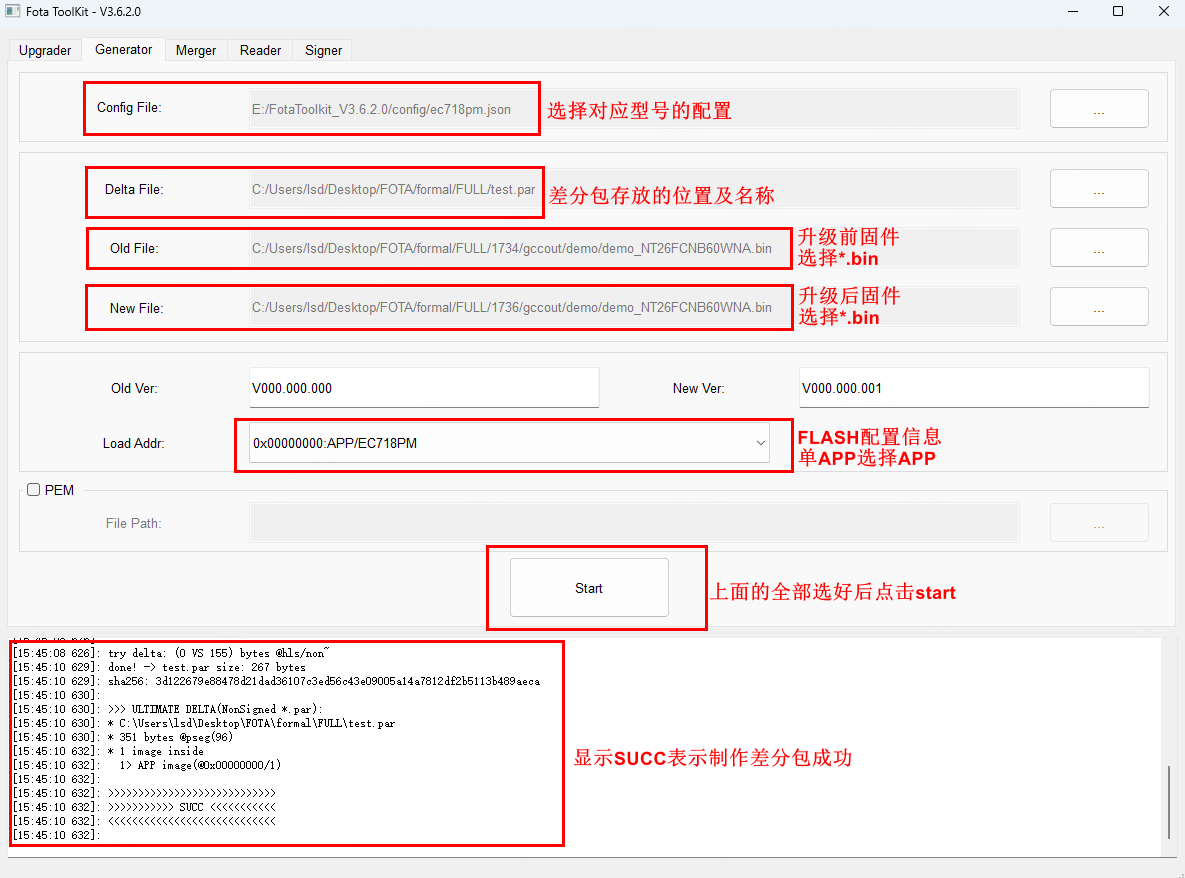
5.1.4 Base Package + APP Differential Upgrade
Applicable to scenarios where both base package and APP application code have been modified. The generated differential package contains difference data for both base package and APP. Operation steps are as follows:
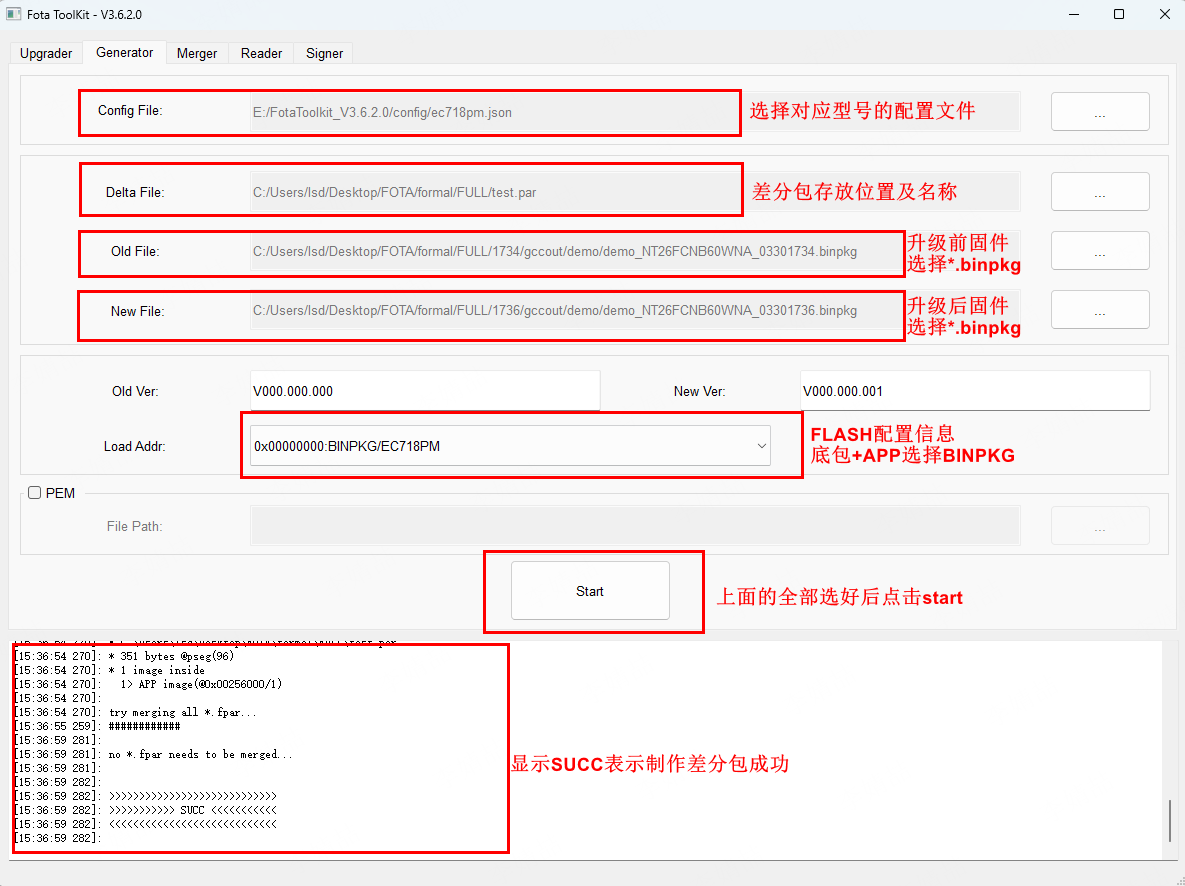
Open the FotaToolkit tool and switch to the Generator tab;
Config File: Click the select button and choose the configuration file corresponding to the module model (e.g., ec718pm.json);
Delta File: Select the save path and name for the differential package, with .par suffix (e.g., C:/FOTA/test.par);
Old File: Select the prepared old firmware file (binpkg format);
New File: Select the prepared new firmware file (binpkg format);
FLASH Configuration: Load Addr package type selects BINPKG (default);
After all parameters are configured, click the Start button, and the tool begins generating the differential package;
The tool log window displays >>>>>>>>>>>SUCC<<<<<<<<<<<, indicating successful differential package creation; if an error is displayed, troubleshoot based on log prompts (e.g., configuration error, firmware format error).
5.1.5 Single APP Differential Upgrade
Applicable to scenarios where only APP application code is modified, with no changes to the base package. The generated differential package contains only APP difference data, with smaller size. Operation steps are as follows:
Open the FotaToolkit tool and switch to the Generator tab;
Config File: Click the select button and choose the configuration file corresponding to the module model (e.g., ec718pm.json);
Delta File: Select the save path and name for the differential package, with .par suffix (e.g., C:/FOTA/test.par);
Old File: Select the prepared old firmware file (bin format);
New File: Select the prepared new firmware file (bin format);
FLASH Configuration: Load Addr package type selects APP;
After all parameters are configured, click the Start button, and the tool begins generating the differential package;
The tool log window displays >>>>>>>>>>>SUCC<<<<<<<<<<<, indicating successful differential package creation; if an error is displayed, troubleshoot based on log prompts (e.g., configuration error, firmware format error).
5.2 HTTP and FTP Environment Setup
When users perform HTTP or FTP FOTA testing, they need to use their own server for remote upgrades. To facilitate early user device debugging, here is the environment setup process and usage guide for Lierda X platform test server.
5.2.1 Platform Login
Login to Lierda X platform: https://account.xiot.senthink.com/, as shown in the figure below, click “Console” to enter the function module window interface.
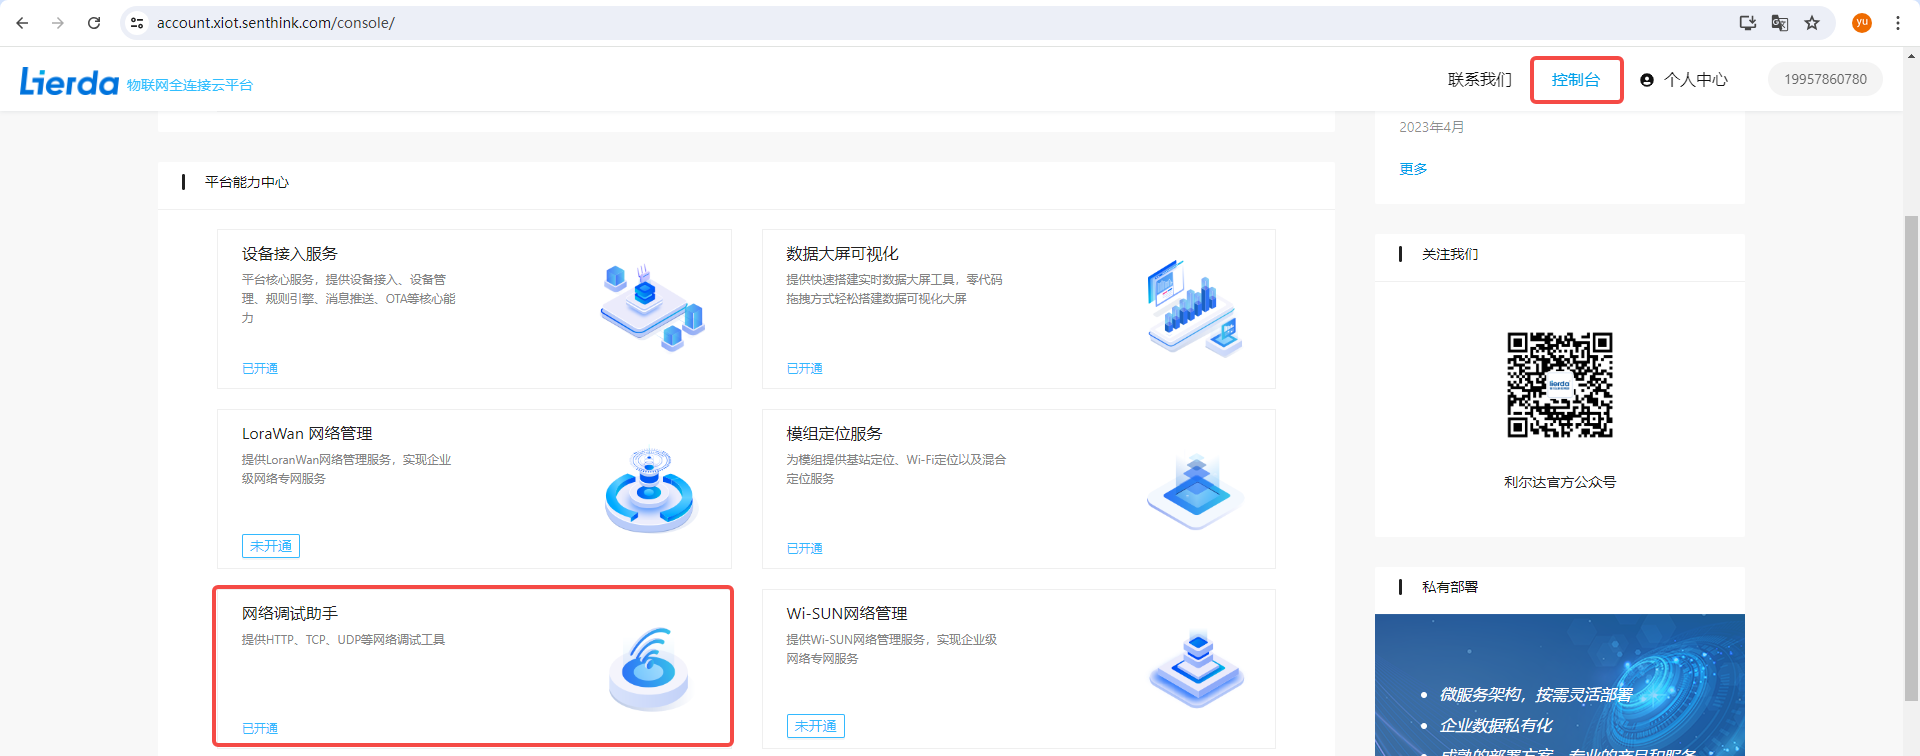
Figure 2.1 Lierda X Platform Network Debugging Assistant
After activation, enter this function module, click “Network Debugging Assistant”, and create the server corresponding to the required test protocol.
5.2.2 Upload FOTA Package
After activating “Network Debugging Assistant” according to Chapter 2.1, enter this function module, select “File Download” on the left, click “Add File”, and upload the created differential package.
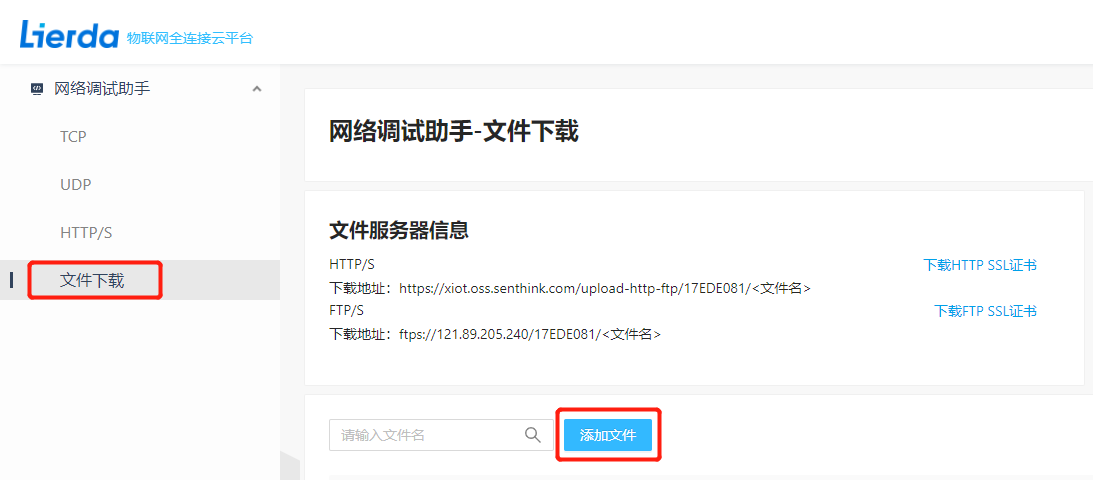
Figure 2.2 Upload Differential Package
Lierda X platform provides fixed download addresses for differential packages uploaded by each user, differentiated only by the user’s differential package name. For example, if the differential package name is fota_test3.par, the complete download address is: http://xiot.oss.senthink.com/upload-http-ftp/5D6A3E7E/fota_test3.par. Users need to write this address during initial program compilation:
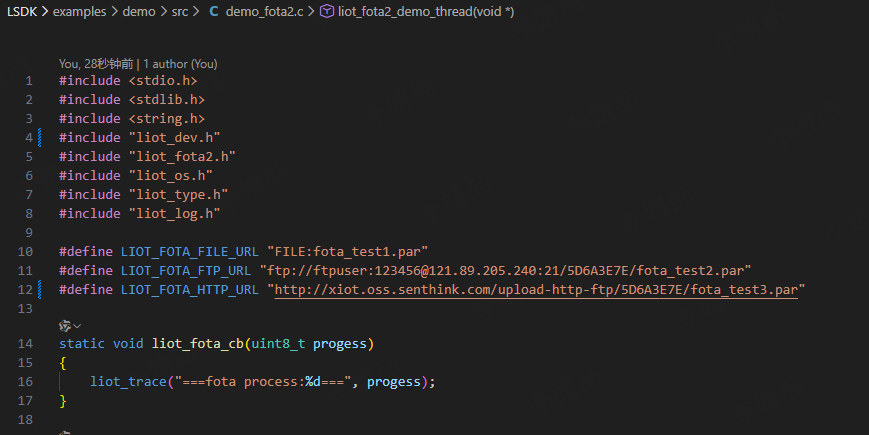
After uploading the differential package, you can obtain the FOTA upgrade address through “View Download Address”.

5.3 FILE Upgrade
FILE upgrade is local file system upgrade. You need to first write the created differential package into the module’s file system. The module reads the differential package from the local file system to complete the upgrade. Users need to write this address during initial program compilation:
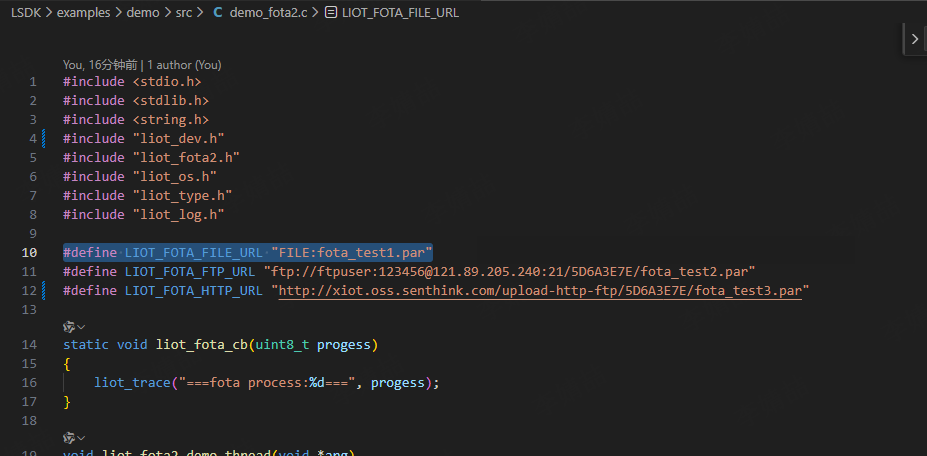
The following describes how to import the differential package into the file system using Windows tools:
Tool link: Please check the attachment “File System Read/Write Tool” in DingTalk documentation.
5.3.1 Obtain Partition Information
Partition information is in LSDK/components/basePkg/[module_model]/partition_info.txt. The following example uses F6B_A. Record the following key partition information (hexadecimal) for subsequent burning:
fs partition: Start (starting address, e.g., 0x321000), Size (size, e.g., 0x0C3000);
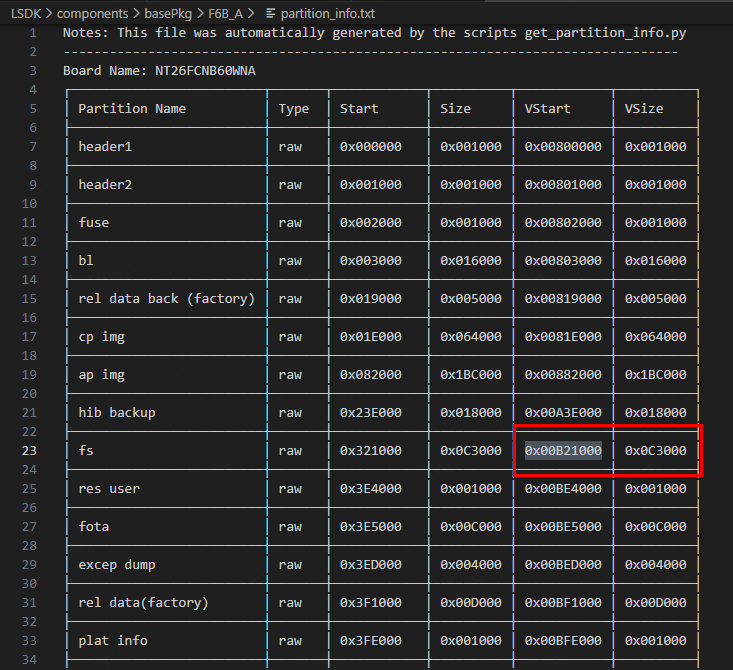
5.3.2 Modify Tool Configuration
Modify the burning tool configuration for the corresponding model product_sets[chip_series][chip_series]products[chip_model][chip_model]\format\format[chip_model].json to actual address and size:
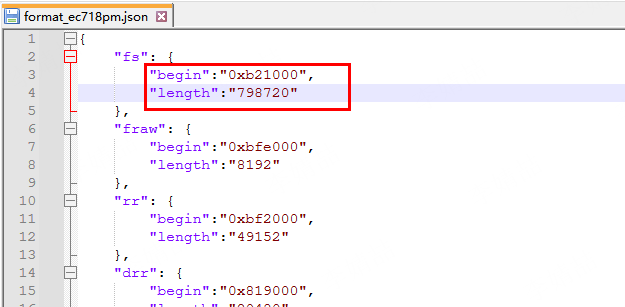
5.3.3 Export File System
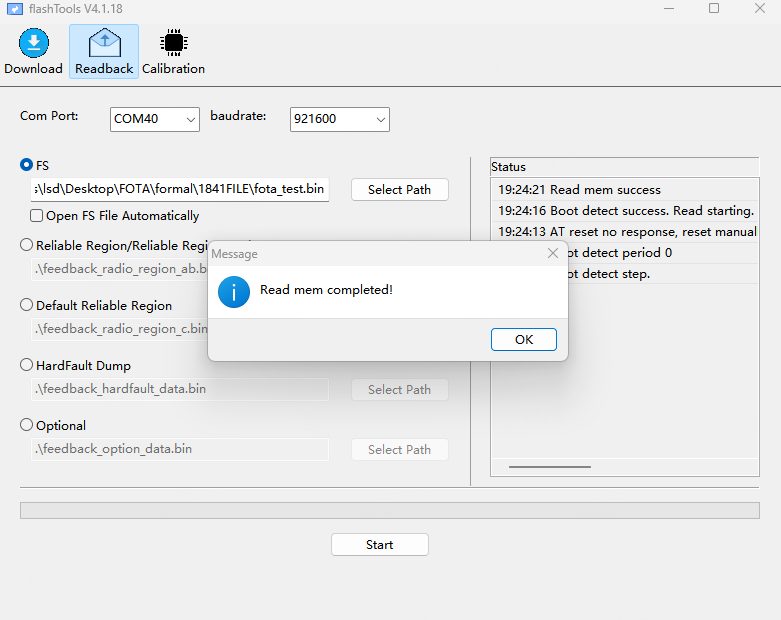
Use EPAT burning tool to export the file system from the module to local. Steps are as follows:
Open EPAT tool, connect the module to computer via USB-to-serial, select the correct Com Port (serial port number), and set baud rate to 921600;
Click the Download tab at the top of the tool, confirm that basic firmware is selected, and the module can start normally;
Switch to the Readback tab, check FS (file system);
Click Select Path, select the save path for local file system, and customize the file name;
Click the Start button, and the tool begins reading the module’s file system and exporting it locally;
The tool log displays
Read mem completed!, indicating successful file system export.
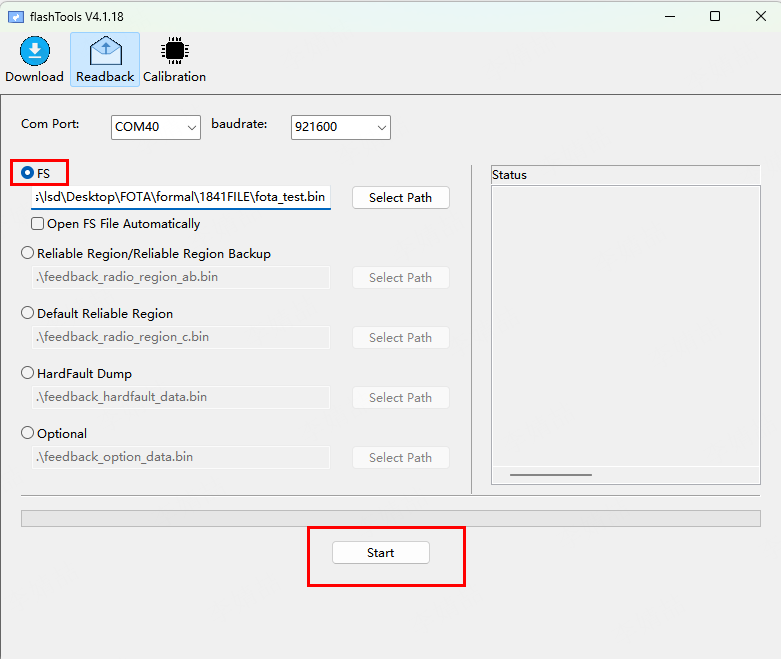
Successful export is shown in the figure below:
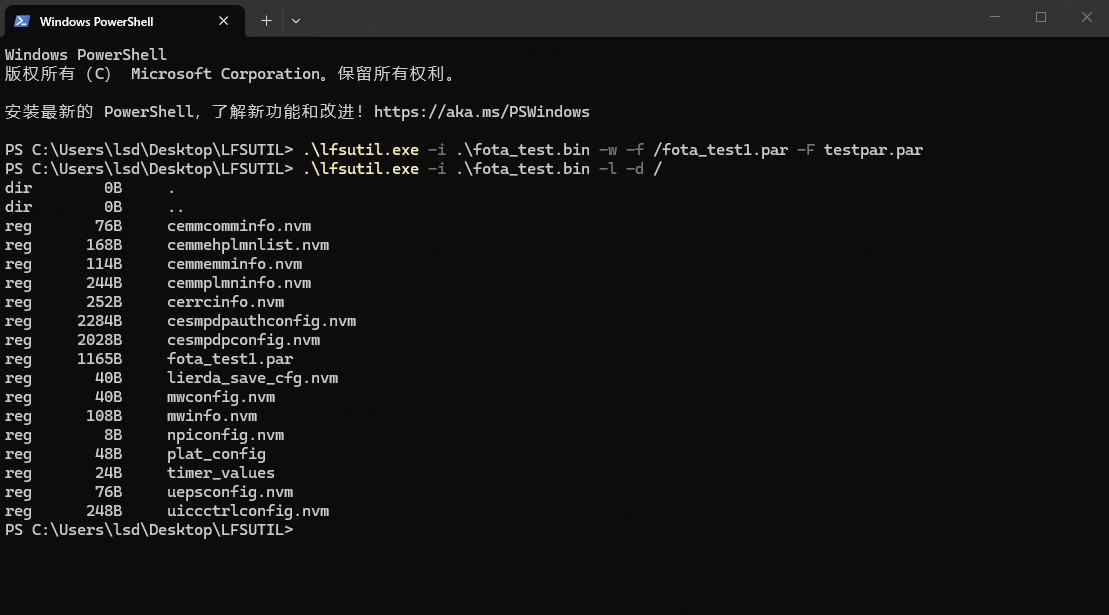
5.3.4 Write Differential Package Using lfsutil
Write the differential package to the file system using the lfsutil tool. For example, if the exported file system is fota_test.bin and the differential package is testpar.par, the name after storing in the file system needs to match the code. In the demo, it is fota_test.par
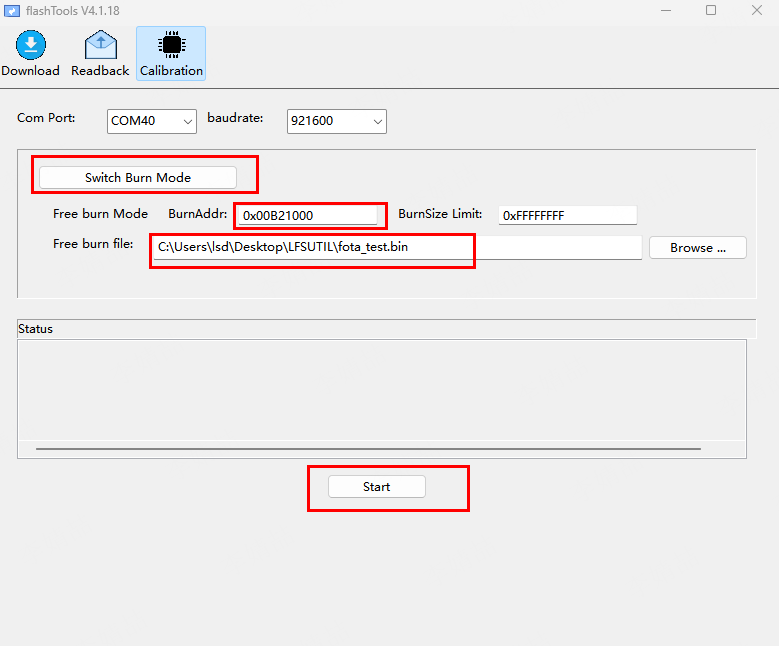
5.3.5 Burn Back to Device
Keep the serial connection between module and computer, open EPAT tool, select the correct serial port number and baud rate;
Click the Calibration tab at the top of the tool, click Switch Burn Mode, and the module enters burn state;
Check Free burn Mode (free burn mode);
BurnAddr: Fill in the starting address of the
fspartition (e.g., 0x00B21000, obtained from partition_info.txt);Free burn file: Click Browse, select the modified file system bin file from step 6.3.4;
Click the Start button, and the tool begins burning the file system back to the module;
After burning completion, the tool prompts Burn Success. Click Reset to reboot the module. At this point, the differential package has been successfully stored in the module’s local file system.
6 Code Examples
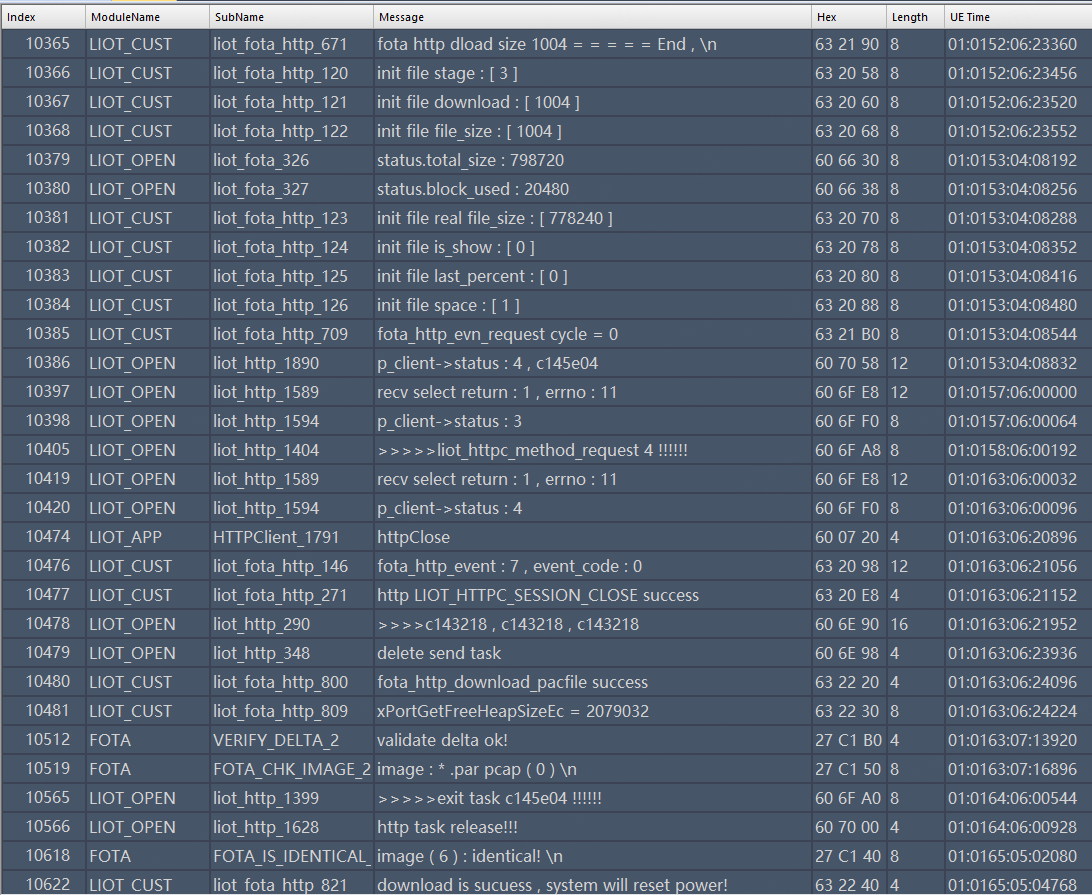
6.1 HTTP Upgrade
Execution result of upgrade via HTTP:
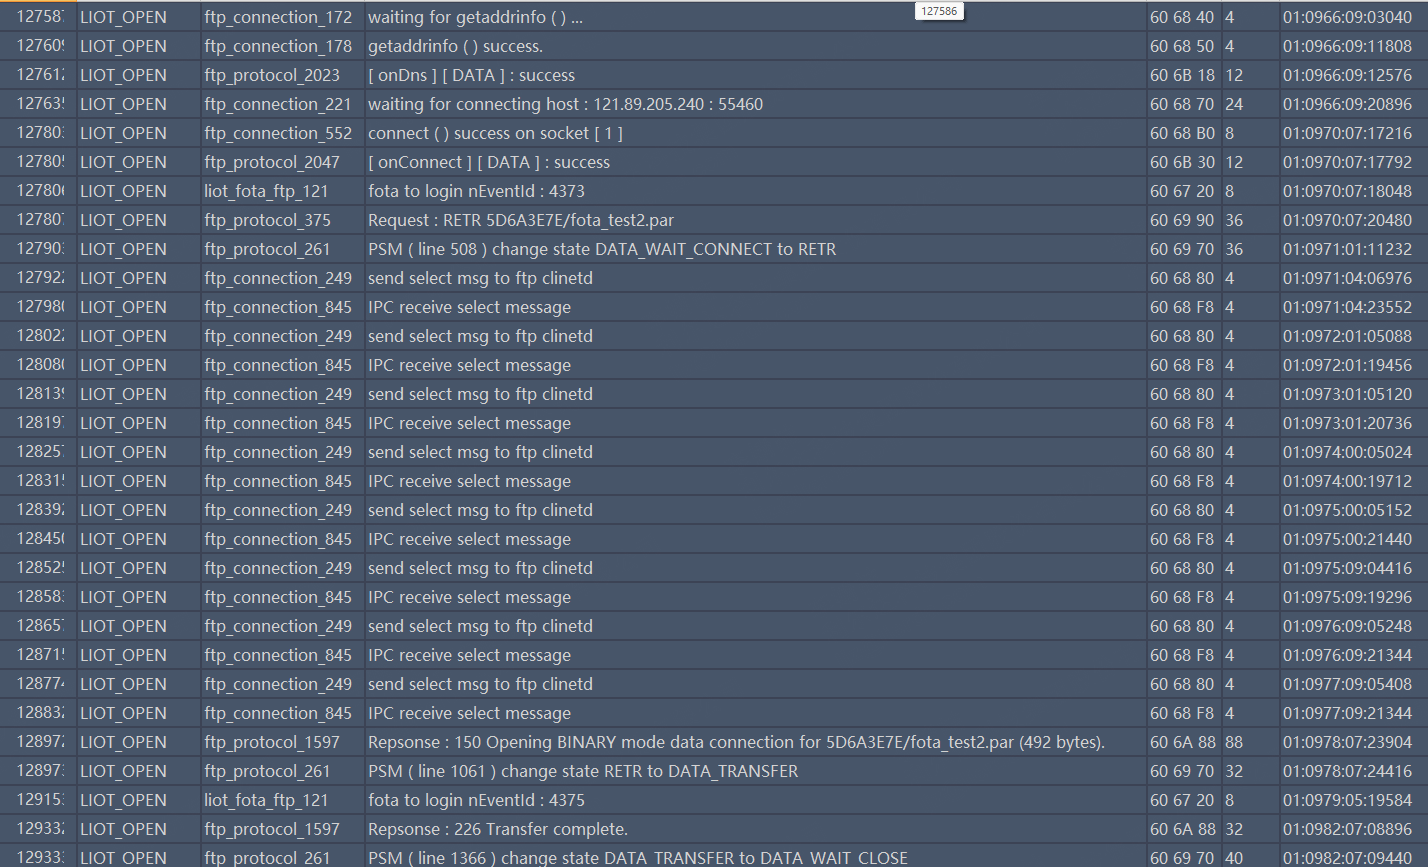
6.2 FTP Upgrade
Execution result of upgrade via FTP:
6.3 FILE Upgrade
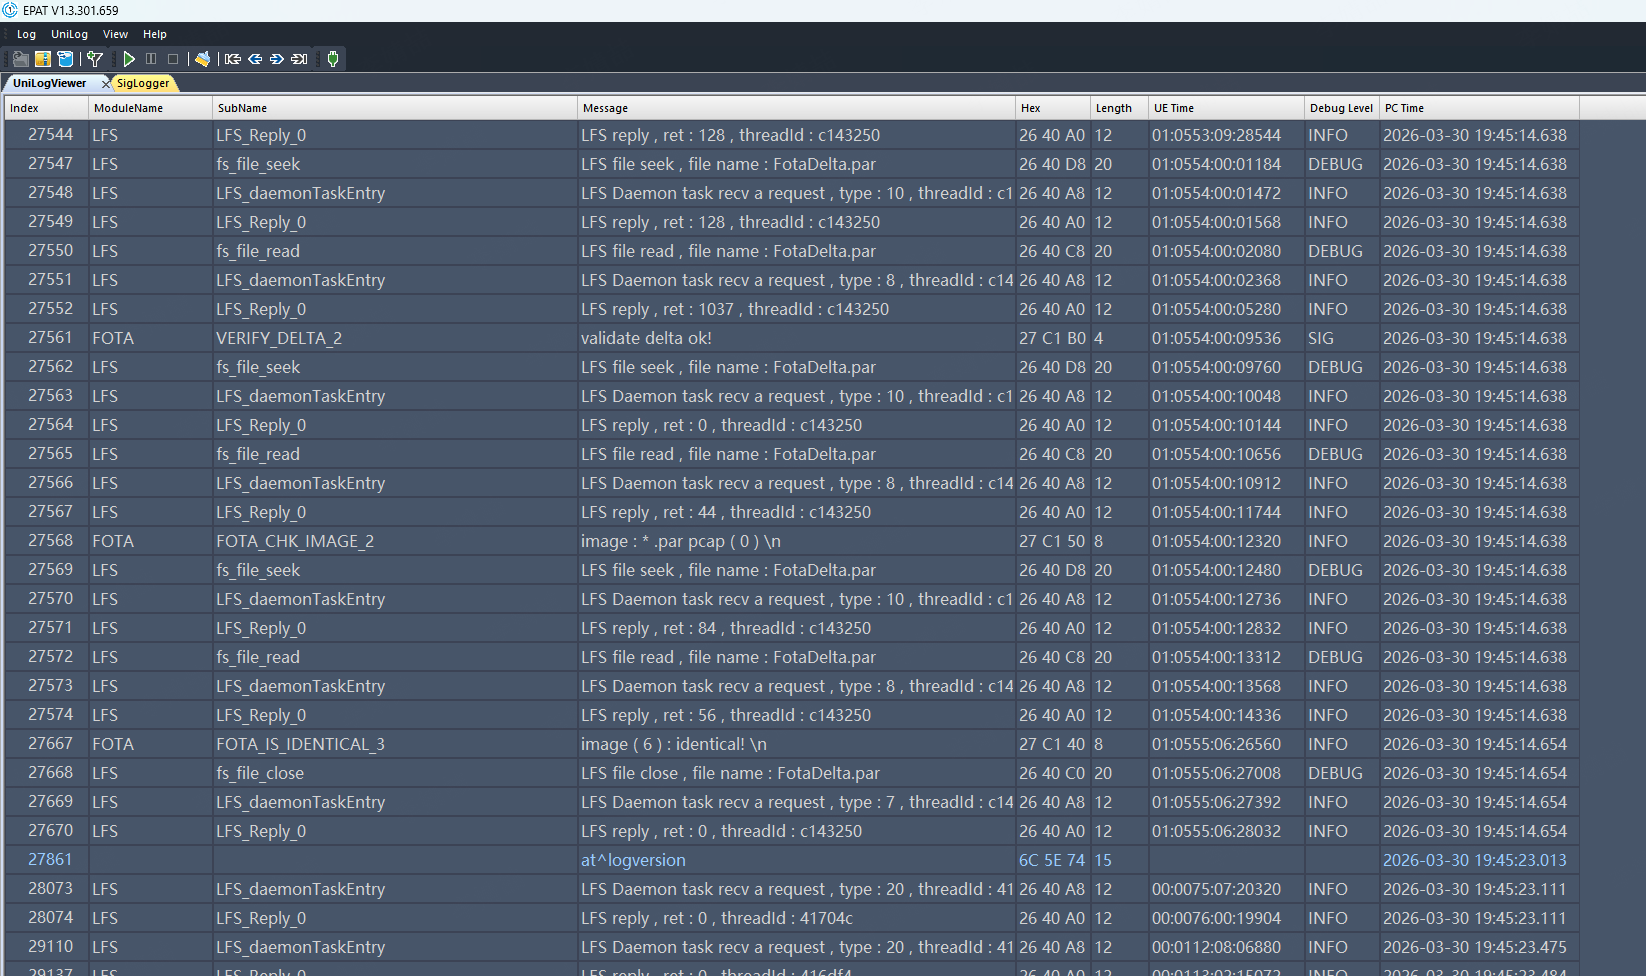
Execution result of upgrade via file system:
7 Common Issues
7.1 “have no space” Prompt When Testing Demo
This prompt indicates that the differential package exceeds the FOTA space limit. You can use a “transitional version” for upgrade. For example, if upgrading from V1 to V10, you can first upgrade from V1 -> V5, then from V5 -> V10.
7.2 Is There a Risk of Exceeding Storage Space?
When creating differential packages, the FotaToolkit tool automatically performs size verification based on the configuration file of the selected chip platform.
If the differential package size exceeds the chip’s FOTA partition capacity, the tool will display an error and abort creation, unable to generate the differential package.
After successful differential package creation, verification against the module’s file system capacity is also required.
Since differential package files are temporarily stored in the file system after download, the actual maximum storable differential package space is:
Available Space = Total File System Size - 24 KB
24 KB is used to store original factory and our company’s related configuration information. Therefore, as long as verification passes during both creation and download phases, there will be no risk of exceeding storage space.
7.3 Storage Location of Firmware After Differential Package Merging and Restoration
During the differential package restoration process, a restore-while-overwrite method is used to directly write to the application code area of Flash.
That is, differential data is written in real-time during unpacking, without occupying additional independent storage space. Therefore, there is no risk of exceeding Flash space.
7.4 Is There a Protection Mechanism for Abnormal Power Loss During FOTA Upgrade?
During Flash erase/write operations, if abnormal power loss occurs, the module has a comprehensive breakpoint protection and recovery mechanism:
During the upgrade process, the system records the current upgrade flag bit and segmented progress information;
When the device is powered on again, Bootloader reads the flag bit to determine the upgrade status;
If an incomplete upgrade task is detected, it will automatically continue executing the subsequent upgrade from the interruption point, ensuring firmware integrity and system recoverability.